
Companies and Offices in SharpeSoft Estimator
- Dylan C
- Sep 10, 2025
- 5 min read
In SharpeSoft Estimator, you can set up as many companies as you like, giving you the ability to match specific job types to specific companies or to set up company offices by region. In this way, you can filter company reports to focus on just the company you want.
You manage your companies from the Companies and Offices window. There, you can set up a new company and offices, or edit an existing record. Once you have entered the company, you will double click on it to enter all of the office details, phone numbers, certifications and your company logo.

To set up a new company, open Estimator; go to the Setup menu and click Companies and Offices. Follow the steps outlined below to set up and activate your new company.
In the Companies and Offices window, click insert in the window's lower left corner (or right click inside the left panel of the window and click Insert in the context menu).
This opens a line in the Code column. There, enter the Code for your company. This will typically be short acronym of the company name. For example, if your company name were Slate Aggregates Inc., you would enter SAI as your code.
Once you have entered the company Code and Name, press Enter.
You will now see this prompt:

UM codes are used for all measurements throughout the system. If you want to load this table into the new company, click OK.
NOTE: If you do not load the default units of measure table, you will have to enter all the units of measure manually, which would require considerable data entry time. SharpeSoft recommends that you load the units of measure table.
Once you have entered your company and loaded the UM table, move to the right panel of the Companies and Offices window to create an Office. The Insert Office window will open. This window contains three tabs where you will enter your Office Information, Certifications, and company Logo.
Office Information tab
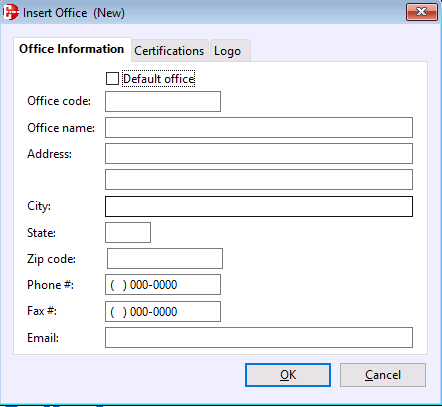
This tab (see above) opens when you first enter the window. It contains all of the basic details about the office, (Code, Name, Address, Phone, etc.).
When you open the window, the Office code and Name should already be filled in. If it isn’t, go ahead and enter them now.
If the office you are entering is to be your default office, click the Default Office box. This will place a check mark next to the office name as it appears in the Companies window.
Move to the Address field and enter the office address. Continue entering information in the remaining fields, using the tab key to advance. When you are finished, move to the Certifications tab.
IMPORTANT: Do not click OK until you are finished entering information in all three tabs.
Certifications tab

In this tab you will enter your company's licensing and DBE information. Starting with License type, enter information into all of the fields, using the tab key to move forward. When finished, move to the Logo tab.
Logo tab

In this tab, click search to select your company logo from your image files. Once an image is selected, it will be displayed in the logo panel. To delete the logo, click trash .
For the best look, it is recommend that your logo image have a square shape and not exceed 800 x 800 pixels. Supported file types include, .jpg, .bmp, .tif, .gif and .png.
NOTE: Even if your company has only one logo for all of its offices, you must link that logo image file to each office record. This is needed because the office information displayed on the Proposal and Scope reports comes from the office assigned to the job and the logo comes from the image file linked to that office.
When finished editing all three tabs, click OK. You will be returned to the Companies window and your office information will now be listed. To edit the information, double click on the office and the Update Office window will open where you can make any needed changes.
Adding Additional Offices
If you want to add additional offices to this company, right click on the Office Name and click Insert in the context menu. The Insert Office window will open. Beginning with the Office Code, enter all of the necessary information into each field of each tab, just as you did with your first office. When ready, click OK and the office will be added to the Company and Offices window.
Activate Company
If you have more than one company listed in your Companies and Offices window, you must select the one you want to mark as your Active Company (the company you want to work with).
To select the Active Company, double click on the Company Name in the left panel of the Companies and Offices window. In the prompt that opens, click Yes.
Alternatively, you can click on the company and click the Activate toolbar button or right click on the company and click Activate Company.
Back in the Companies and Offices window, the active company will be highlighted in dark blue across all columns.
REMEMBER: The active company is the company under which you are currently working. If you have two or more companies set up in the Companies/Offices table and you cannot find the job you are looking for in the Jobs window, it may be that the wrong company has been activated.

Populate Tables and Defaults
You can have as many companies as you wish and each company can have as many offices as you need. However, each company is an individual entity with its own jobs, cost data, resource tables, vendors, and security settings. Data can be shared between company offices, but not between the companies themselves.
When you create and activate a new company, its Jobs window, resource Tables (Labor, Materials, Equipment, etc.) and certain defaults windows will be empty. These windows will need to be populated.
Your Jobs window will populate as you set up jobs for the new company. To populate your resource Tables, you will export the table data from your first or original company into spreadsheets. Then, you will activate your new company and import the spreadsheet data into the new company's tables.
When you import your Labor table data into your new company, the defaults for Labor Areas, Labor Groups, Trades and Workers Compensation will be loaded into those defaults windows automatically. Likewise, when you import your Equipment table data into your new company, your defaults for Equipment Areas, Equipment Groups and Fuel/Oil Default Costs will loaded automatically into their respective windows.
Conclusion
Getting started with SharpeSoft is a breeze. Whether you are looking to create a new job or add one, SharpeSoft has got your back. We have the tools and expertise necessary to help you make it happen without breaking a sweat.
You can continue on to other helpful Fast Trax articles found in the Blog section. To learn more about this particular subject, consult your system Help manual, or just give us a call and we’ll be glad to walk you through it.

Comments